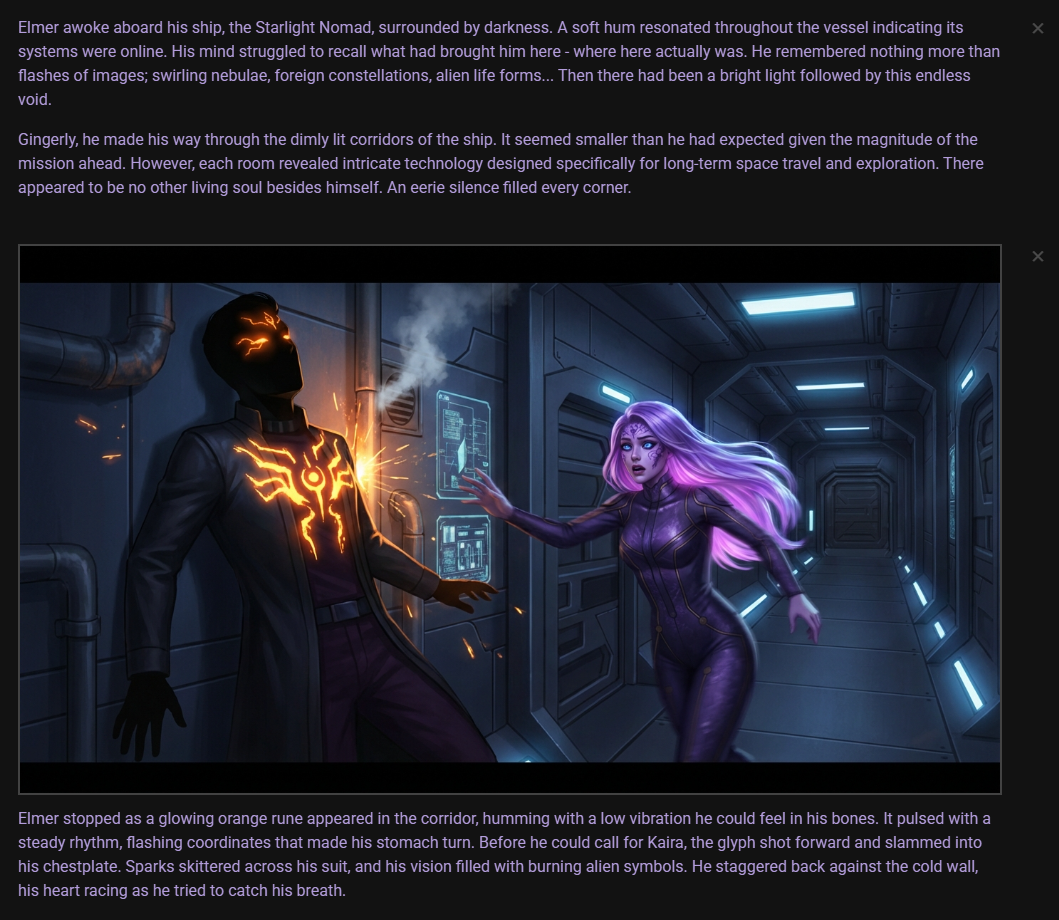
Inline Visuals
Inline visuals is a feature introduced in version 0.35.0 that displays generated images directly within your scene feed. When you create images through the scene tools or director actions, they can now appear alongside the messages in your story, providing a more immersive visual experience.
How It Works
When you generate an image using Talemate's visualization features, the image can be automatically attached to messages in your scene feed. The type of image and where it appears depends on how it was generated:
- Scene illustrations appear with narrator messages or the most recent relevant message
- Character portraits appear alongside character dialogue
- Character cards can be attached to messages featuring that character
The images are displayed inline with the message text, or above the message for larger scene illustrations.
Generating Inline Visuals
There are several ways to generate images that appear in your scene feed:
Scene Tools
The quickest way to generate inline visuals is through the scene tools visualizer menu.
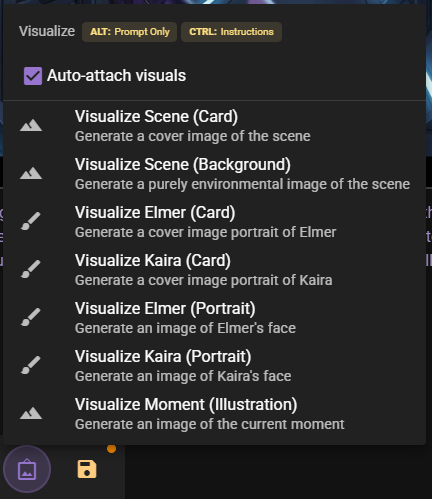
From this menu you can:
- Visualize Scene (Card): Generate a cover image of the current scene
- Visualize Scene (Background): Generate a purely environmental image
- Visualize [Character] (Card): Generate a cover image portrait of a character
- Visualize [Character] (Portrait): Generate a face-focused portrait
- Visualize Moment (Illustration): Generate an image of the current moment in the story
Keyboard Modifiers
- Hold ALT to generate only the prompt without creating an image
- Hold CTRL to open a dialog where you can provide custom instructions
When you generate an image and the Auto-attach visuals option is enabled, the resulting image will automatically appear in your scene feed attached to the most relevant message.
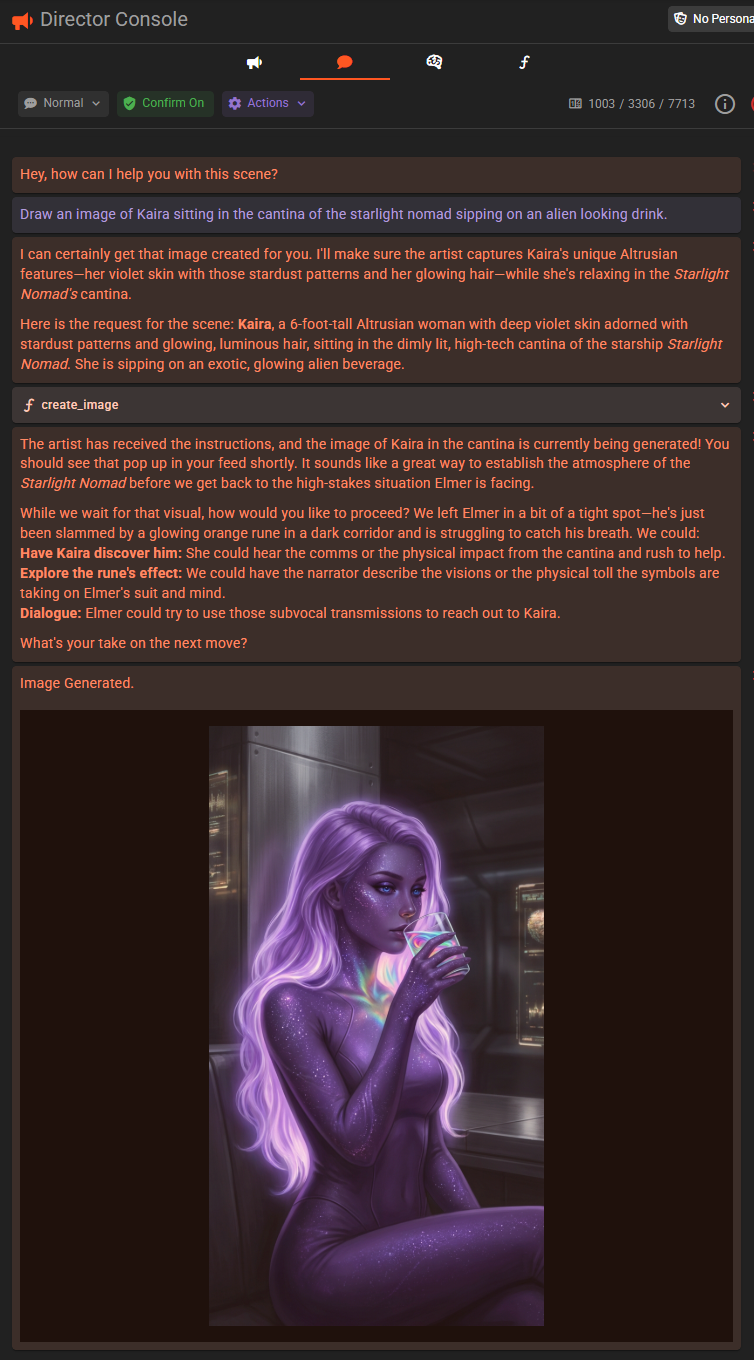
Director Chat
You can also ask the Director to generate images through the director chat interface. Simply describe what you want to visualize, and if the Director has visual generation capabilities enabled, it will create the image and attach it to the conversation.
For more information on using the Director chat, see the Director Chat documentation.
Autonomous Scene Direction
When using the autonomous scene direction feature, the Director can automatically generate images at appropriate moments during scene progression. These images appear in the scene feed just like manually generated ones.
Interacting with Inline Visuals
Once an image appears in your scene feed, you can interact with it in several ways.
Viewing and Managing
Click on any inline visual to open a context menu with options:
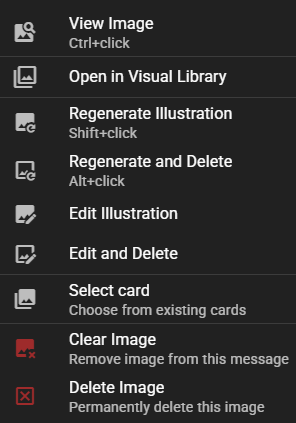
- View Image: Open a full-size view of the image (also available with Ctrl+click)
- Open in Visual Library: View and manage the image in the Visual Library
- Regenerate Illustration: Create a new version of the image (Shift+click shortcut)
- Regenerate and Delete: Replace the current image with a new one (Alt+click shortcut)
- Edit Illustration: Regenerate with custom editing instructions
- Select illustration: Choose from existing scene illustrations
- Clear Image: Remove the image from this message (keeps the image in your library)
- Delete Image: Permanently remove the image
Quick Actions
For faster workflow, inline visuals support several keyboard shortcuts when clicking:
| Action | Shortcut |
|---|---|
| View full image | Ctrl+click |
| Regenerate | Shift+click |
| Regenerate and delete old | Alt+click |
Managing Portraits
For character portraits (avatars), you have additional options:
- Auto-select portrait: Let the AI determine the best portrait for this message
- Generate new portrait: Create a new portrait based on the current scene context
- Select portrait: Choose from existing portraits for this character
Configuring Display Settings
You can customize how inline visuals appear through the Appearance Settings.
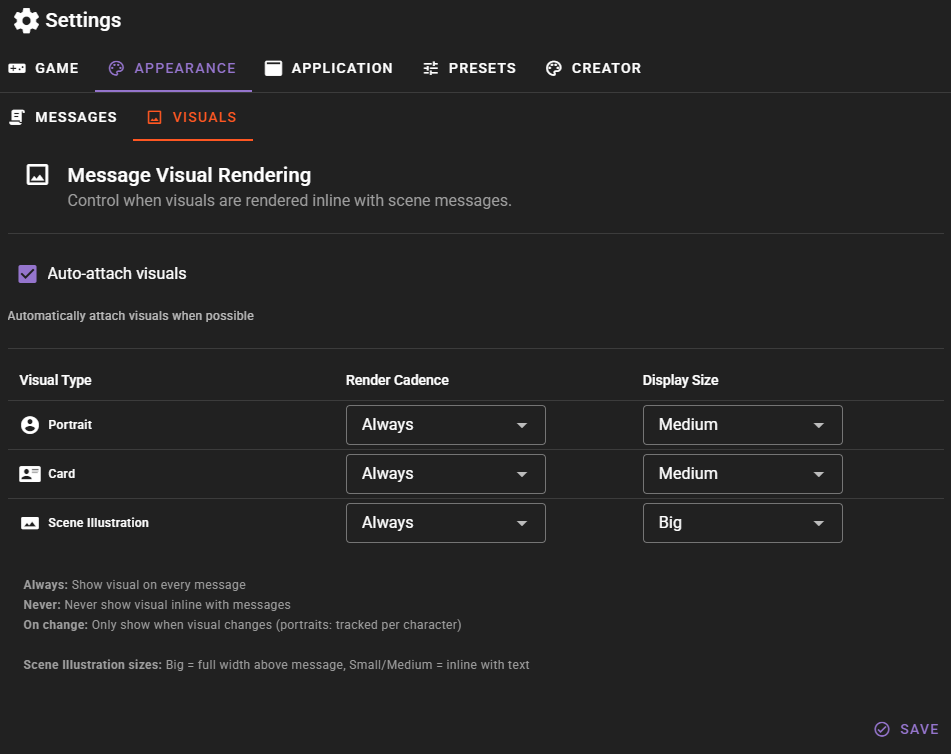
Visual Types
Configure settings independently for each type of visual:
- Portrait: Character face images
- Card: Character or scene cards
- Scene Illustration: Full scene images
Render Cadence
Control when visuals are displayed:
| Setting | Behavior |
|---|---|
| Always | Show on every message that has a visual attached |
| Never | Never show visuals inline (images still saved in Visual Library) |
| On change | Only show when the visual differs from the previous one (portraits only) |
On Change Tracking
The "On change" cadence tracks portraits per character. So if character A speaks twice with the same portrait, only the first message shows the portrait. But character B speaking between them would show B's portrait normally.
Display Size
Control how large visuals appear:
| Size | Description |
|---|---|
| Small | Compact display, minimal space usage |
| Medium | Balanced size (default) |
| Big | Large display; scene illustrations appear above messages |
Auto-attach Visuals
The Auto-attach visuals toggle controls whether newly generated images are automatically attached to messages. When disabled, images go to the Visual Library but don't appear in the scene feed unless you manually attach them.
You can also toggle this setting quickly from the scene tools visualizer menu without opening the full settings panel.
Visual Types Explained
Understanding the different visual types helps you choose the right one for your needs:
Scene Illustration
Best for capturing a specific moment in the story. These images typically show the environment and characters together, depicting what's happening at a particular point in the narrative. Scene illustrations work well for important story beats or visually striking moments.
Scene Background
Environmental images without characters. Use these when you want to establish the setting or atmosphere without focusing on any particular character.
Scene Card
A portrait-oriented cover image for the scene. Good for establishing shots or title cards.
Character Card
Full-body or half-body portrait of a character in the current scene context. These are larger, more detailed character images.
Character Portrait
Face-focused images of characters. These are ideal for showing expressions and emotions during dialogue.
Requirements
To use inline visuals, you need:
- A configured Visualizer Agent with a working image generation backend
- A scene loaded with at least some content
The feature works with any of the supported image generation backends, including Google, ComfyUI, OpenAI, and others. See the Visualizer Agent documentation for setup instructions.
Related Features
- Visual Library - Managing and organizing your generated images
- Visualizer Agent - Configuring image generation
- Director Chat - Generating images through conversation
- Appearance Settings - Customizing display options