Character Visuals
The Visuals tab in the Character Editor provides a dedicated interface for managing all visual assets associated with a character, including portraits and cover images. This feature makes it easy to organize, generate, and iterate on character imagery without needing to navigate through the full Visual Library.
To access the Visuals tab, open the World Editor and navigate to the Characters tab. Select a character, then click on the Visuals tab.
Overview
The Visuals tab is organized into three sub-tabs:
- Cover Image - Manage full character reference images
- Portrait - Manage character portraits used in dialogue
- Rules - Define permanent visual traits for image generation
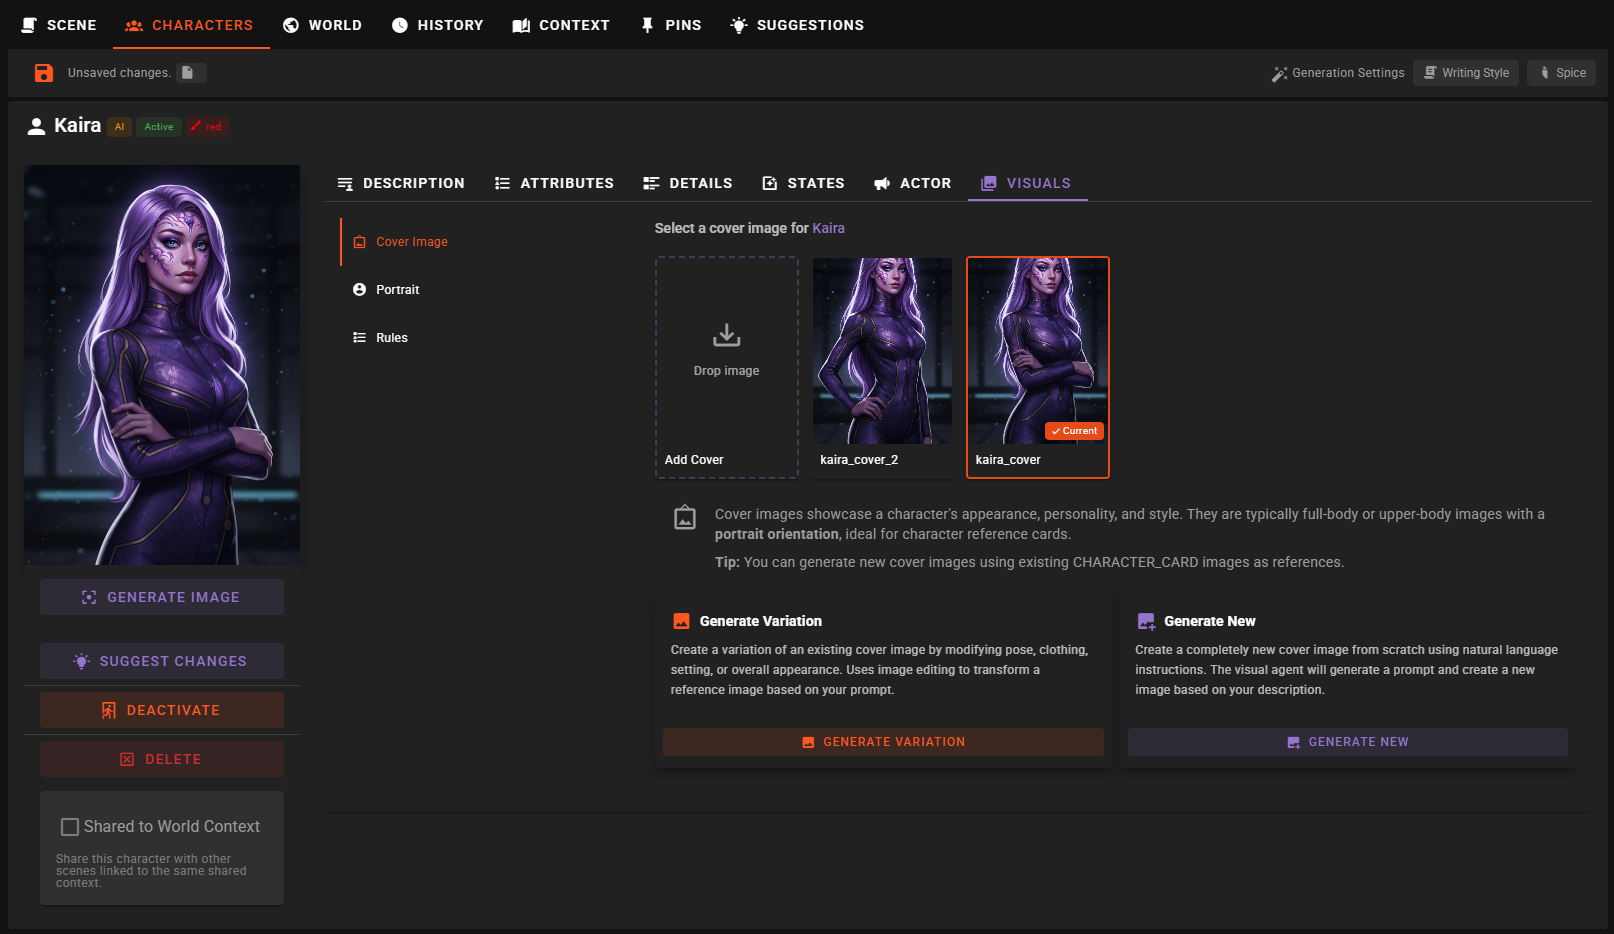
Cover Image
Cover images showcase a character's full appearance, personality, and style. They are typically upper-body or full-body images in portrait orientation, ideal for character reference cards.
Viewing and Selecting Cover Images
The Cover Image view displays all images of type CHARACTER_CARD associated with this character. Each image appears as a thumbnail in a grid layout.
- Images marked as the Current cover image display a badge indicator
- Click on any image to access the context menu with available actions
Adding Cover Images
You can add new cover images in several ways:
- Drag and Drop: Drag an image file directly onto the drop zone labeled "Add Cover"
- Generate from Reference: Create a new cover image based on an existing character image
- Generate New: Create a completely new cover image from scratch using AI
Context Menu Actions
Right-click (or tap) on any cover image to access these options:
- Set as Cover Image: Make this the character's primary cover image
- Set as Scene Cover Image: Use this image as the cover for the entire scene
- View Image: Open a larger preview of the image
- Open in Visual Library: View and edit the image in the full Visual Library interface
- Delete: Permanently remove the image from the scene assets
Generating Cover Images
When the Visual Agent is configured, you can generate new cover images directly from this view.
Generate from Reference / Generate Variation
This option uses an existing character image as a reference to create a new cover image. This is particularly useful for:
- Creating your first cover image from an existing portrait or other character image
- Creating variations of existing cover images with different poses, clothing, or settings
To generate a variation:
- Click Generate Variation (or Generate from Reference if no cover images exist yet)
- Select a reference image from the carousel if multiple are available
- Enter a prompt describing the changes you want (e.g., "change pose to standing", "add armor", "different background")
- Choose between Single mode for one image, or Batch mode to queue multiple variations
- Click Generate or Queue Batch
Image Edit Backend Required
Generating variations requires an image editing backend to be configured in your Visual Agent settings. If unavailable, a warning message will appear.
Generate New
This option creates a completely new cover image from scratch using natural language instructions.
To generate a new image:
- Click Generate New
- Enter instructions describing the cover image you want (e.g., "Create a portrait-oriented cover image showcasing the character's appearance and style")
- Click Generate
The Visual Agent will use your instructions along with the character's information to create an appropriate prompt for image generation.
Text-to-Image Backend Required
Generating new images requires a text-to-image backend to be configured in your Visual Agent settings. If unavailable, a warning message will appear.
Portrait
Portraits are face-focused images used in dialogue messages and character lists. They are typically in square format and help identify characters during conversations.
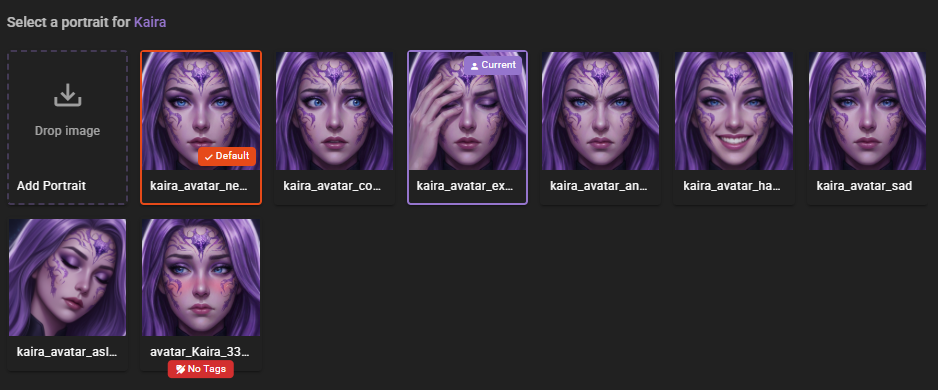
Portrait Types
The Portrait view manages images of type CHARACTER_PORTRAIT and tracks two distinct portrait roles:
- Default Portrait: The fallback portrait used when no contextual portrait is selected. Marked with a "Default" badge.
- Current Portrait: The portrait currently being displayed in dialogue messages. Marked with a "Current" badge.
Managing Portraits
The portrait management interface works similarly to cover images:
- Drag and Drop: Add new portraits by dropping image files onto the drop zone
- Generate from Reference: Create portraits based on existing character images
- Generate New: Create completely new portraits using AI
Context Menu Actions
Right-click (or tap) on any portrait to access:
- Set as Default: Make this the character's fallback portrait
- Set as Current: Immediately use this portrait for dialogue messages
- View Image: Open a larger preview
- Open in Visual Library: View and edit tags in the Visual Library (helpful for automatic portrait selection)
- Delete: Permanently remove the portrait
Generating Portraits
Portrait generation works similarly to cover images but is optimized for close-up, face-focused results.
Generate from Reference / Generate Variation
When generating portrait variations, common prompts include:
- "change the expression to sad"
- "make them happy"
- "angry expression"
- "generate close up of the character's head with a neutral expression"
You can add tags directly in your prompt using the {tag} syntax (e.g., {happy} {portrait}). These tags help with automatic portrait selection later.
Batch Generation
Both portrait and cover image generation support Batch mode. This allows you to queue multiple prompts at once, each generating a separate image. All batch generations use the same reference image and are processed through the Visual Library queue.
Automatic Portrait Selection
Once you have at least 2 portraits for a character, the World State Agent can automatically select the most appropriate portrait based on the current moment in the scene.
The agent checks the tags stored with each image to decide which portrait best matches the character's current emotional state or situation.
To enable and configure automatic portrait selection:
- Make sure your portraits have relevant tags (open in Visual Library to edit tags)
- Go to Agent Settings > World State Agent > Character Portraits
- Set the Selection Frequency (1 = every message, 10 = every 10th message, 0 = disabled)
Tag Your Portraits
For automatic selection to work well, make sure to tag your portraits with relevant descriptors like "happy", "sad", "angry", "neutral", "thoughtful", etc. You can edit tags by opening the portrait in the Visual Library.
Missing Tags Warning
Portraits without tags display a "No Tags" badge. This serves as a reminder to add tags so the portrait can be properly selected during automatic portrait selection.
Rules
The Rules tab allows you to define Static Visual Rules for the character. These are permanent physical traits or anatomical rules that should be enforced for every image generated for this character.
About Static Visual Rules
Visual rules are included in every image generation prompt for this character, ensuring visual consistency across all generated images.
Good examples of visual rules:
- "Always has a cybernetic left arm"
- "Has a distinct birthmark on their neck"
- "Has heterochromia (left eye blue, right eye green)"
- "Missing the ring finger on their right hand"
- "Has a prominent scar across their left cheek"
What NOT to include:
- Clothing details (these change between scenes)
- Art style preferences (configure these in Visual Agent settings)
- Temporary states like injuries or emotions
Visual rules are saved automatically when you click outside the text field.
Prerequisites
To use the image generation features in the Visuals tab, you need to have the Visual Agent properly configured:
- Text-to-Image Backend: Required for "Generate New" functionality
- Image Edit Backend: Required for "Generate Variation" and reference-based generation
- Image Analysis Backend: Required for analyzing images (available in Visual Library)
For information on configuring these backends, see the Visual Agent Configuration documentation.
Related Features
- Visual Library - Full image management interface with advanced features like analysis and tagging
- World State Agent Settings - Configure automatic portrait selection frequency
- Character Editor - Overview of all character editing features